Our Tillery Skirts really start to look polished today! We’re going to construct the front placket and sew the hemline. This construction order is extra nice because you won’t ever have that “I’m all done except the hemming” part – it’ll already be done.
To begin, press each center front edge 1/2″ (12 mm) to the wrong side. Unfold, then take one of your 1″ (25 mm) strips of interfacing and fuse it along each of the two creases you just made.

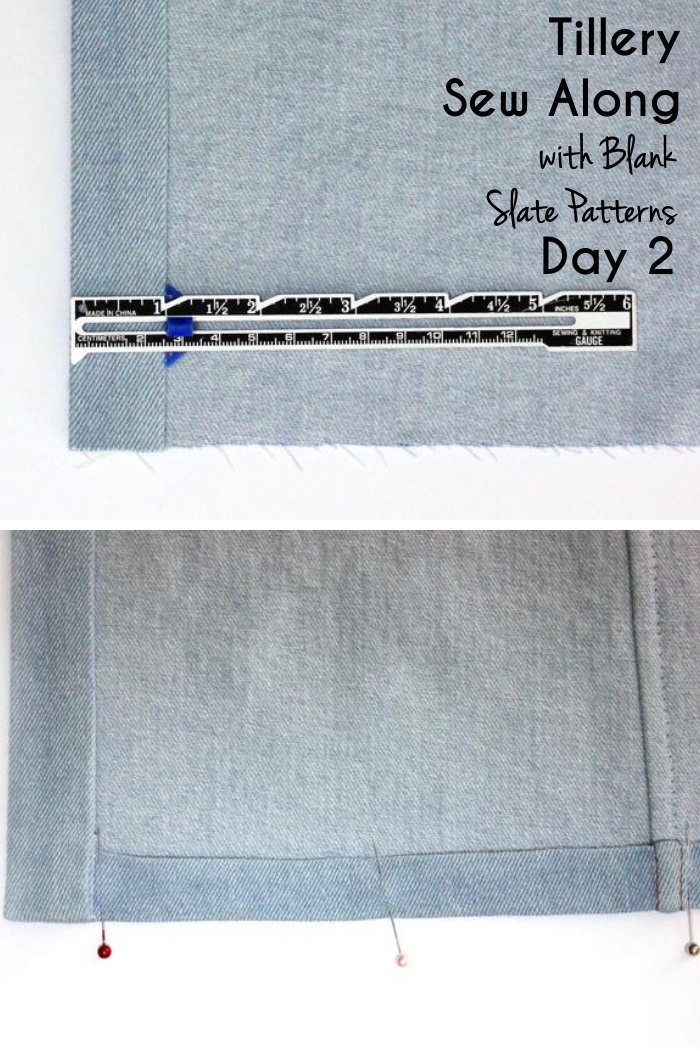
Now, press the center front edges again, this time 1″ (25 mm) to the wrong side. This pressed fold should correspond to the “fold line” you marked from your pattern piece, and the fabric should want to fold there naturally because that’s the edge of the interfacing. The finished plackets will be 1″ (25 mm) wide.

At the bottom edge of each center front, fold back the placket so that it is right sides together with the front of the skirt. Stitch across the placket only, 1″ (25 mm) from the bottom raw edge of the skirt.

Turn this area right side out and press. Nifty, right? This creates a nice corner at the center front lines which is neater than making a double fold hem there.

Now finish folding and pressing the hemline. Turn the raw edge 1/4″ to the wrong side and press; then turn another 3/4″ to the wrong side and press again. Pin to hold the hem in place.
For the placket topstitching, I’m going to show you a little trick. First of all you’ll need to decide on which side of your skirt the tops of the snaps will go. It feels comfortable to me on my left, so that’s my top placket. With the topstitching thread you used for the flat-felled seams, topstitch the top placket on each side, 1/8″ and 7/8″ from the outside folded edge. (Top placket is the right one in the photo below.)

However, for the underneath placket, make your topstitching lines 1/8″ and 3/4″ from the folded edge, using a thread color that blends instead of your topstitching thread. (Underneath placket is the left one in the photo above.) This bit of insurance helps ensure that the topstitching on the bottom placket isn’t visible when the skirt is closed. If it’s showing, it will look like your skirt is too tight even if it isn’t, because the appearance is that it’s being “pulled apart.”

Lastly, stitch the hem in place, from the inside column of stitching on one placket around to the inside column on the other. Note: stitching over the flat felled seams on the hem can be tricky due to all the layers. There are some great tips in this post.
Such progress! Tomorrow we’ll attach the waistband and belt loops…
See also:
Tillery Sewalong Day 1: Printing, Cutting, and Materials
Tillery Sewalong Day 2: Flat Felled Seams
Tillery Sewalong Day 4: Waistband and Belt Loops
Tillery Sewalong Day 5: Snaps and Pockets